Swarm Control Update
Continuing our development of the Swarm Control app we now released an updated version v0.2. In this version we included more robots to control and started to tackle the goal to control a swarm of robots. In addition, we tried to make the remote control more user friendly and added a joystick element to the user interface for driving.
New Robots
In order to reach our goal to control a heterogeneous swarm of robots we first had to add more robots to our swarm; the more different their capabilities and sensors the better.
Meccano Spykee
With the Spykee we extended our collection of robots by the first WiFi robot.
It comes with a docking station and includes a USB webcam, a microphone, a
speaker and 5 leds. With the Spykee we are now able to stream video from the
robot to the phone.
For a more detailed review of the Spykee see our blog post
here.
Prerequisites
By default the Spykee creates an AdHoc network and waits for connections but it has also the functionality to connect to any AccessPoint. Because Android prevents the phones from connecting to AdHoc networks the settings have to be adjusted so that it connects to the same network that the phone is using. Next in the app, when connecting to the Spykee the settings have to be entered (IP Address of the Spykee, Port (default 9000), user name and password).
Control
With this setup we are now able to control the Spykee remotely:
- Drive the Spykee with one of the available control options (Arrow Keys, Accelerometer, Joystick)
- Turn the leds on and off
- Start the automatic Docking (if it is undocked) and start Undock (if it is docked)
- Let the Spykee play one of it’s pre-recorded sound effects
Sensors
As sensors, the Spykee provides us with the battery level and the docking state (Docked / Undocked) and in addition sends the video of the USB webcam as a stream to be displayed on the phone.
Wowwee RoboScooper
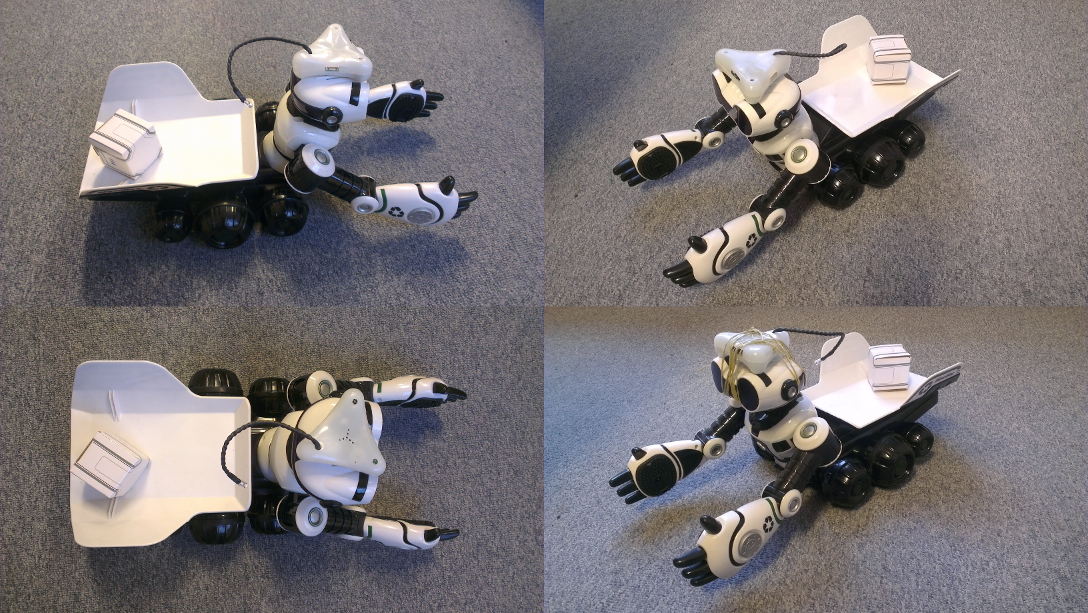
The RoboScooper is a remote controllable robot that can autonomously pick up small objects from the floor. It is equipped with IR sensors to detect and avoid objects as well as detect objects between it’s hands to pick up. In addition, it has bumper sensors in it’s index fingers to detect if it hits an obstacle. The RoboScooper comes with an IR remote control to drive it around manually but has no means to connect directly to a phone or computer.
Prerequisites
In order to control the RoboScooper from an Android phone we used a brainlink. This handy and lightweight device is equipped with Bluetooth, an IR Receiver and Emitter and additional IO connectors. Strapped to the head of the Roboscooper, we can now connect it with any Android phone supporting Bluetooth and send it any signal available from the remote control.
Control
Thanks to the brainlink we are able to control the RoboScooper remotely:
- Drive the Spykee with one of the available control options (Arrow Keys, Accelerometer, Joystick)
- Enable / Disable Vision
- Enter one of the Play Modes: Clean Sweep, Pick-up, Talk or Whack
- Pick-up / Dump objects
Sensors
The RoboScooper itself doesn’t provide us with any of it’s sensory feedback. However we can display the sensors of the brainlink which are:
- Battery Level (of the Brainlink)
- Light Sensor
- Accelerometer (x, y and z-Axis in Gs)
Brainlink
With the Brainlink we can now add any IR controlled robot to our app. More
precisely, with the utility tool ‘Signal Analyzer’ we can capture, analyze and
store any IR signal as long as we have a remote control available. Once the
signals are stored, the device file has to be placed on the phone and the
program will transmit the respective signal to the brainlink which will
convert the signal to IR pulses and emit them from the IR emitter.
The same way the utility tool ‘Signal Analyzer’ is using the brainlink to
capture IR signals, we could also use it programatically to detect IR signals
and respond to them accordingly.
Note that this concept can also be applied to any other IR controlled device and is not restricted to robots only.
Parrot AR.Drone
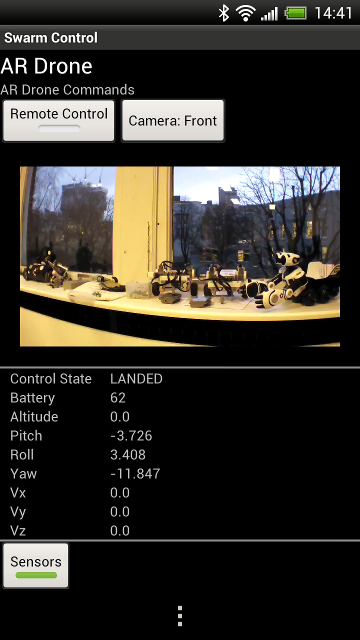
One of the more interesting in our choice of robots is the AR Drone, a fully autonomous, radio controlled quadrocopter. It connects to a device over WiFi and has two cameras which can be displayed: a wide angle camera pointing forward and a high speed camera pointing down. A 6 degrees of freedom inertial measurement unit provides pitch, roll and and yaw measures which are used for stabilization and assisted tilting control. In addition, the AR Drone uses its vertical camera to detect ground movement which is used together with the gyroscope to stabilize the drone in hover mode. An ultrasound altimeter provides altitude and vertical speed control. All in all an excellent choice for a flying robotic platform. A detailed review can be found here.
The AR Drone comes in to versions. The AR Drone and the AR Drone 2.0 which are both supported in our app.
Prerequisites
The AR Drone 2.0 creates an AccessPoint and is ready to for connecting with any Android phone. The AR Drone however creates an AdHoc Network by default and cannot be used with an Android phone out of the box. To overcome this, the firmware of the Parrot needs to be updated to 1.7.4 in order to turn the WiFi to Access Point mode. The firmware and a tutorial can be found here.
Control
With ths we can now control the AR Drone remotely:
- Take Off / Land
- Execute the following basic moves with Arrow keys:
- Forward / Backward
- Left / Right
- Rotate Left / Right
- Up / Down
- Set Altitude
- Switch Camera (Front / Down)
Sensors
The AR Drone provides us with measurement and navigational data such as:
- Battery level
- Acceleration Values (x, y, z-Axis)
- Pitch / Roll / Yaw Values
- Altitude
In addition, we can turn on and display the video stream received from the AR
Drone.
For the AR Drone, this consists of a 93° wide angle front camera with a
resolution of 640x480 VGA and a high speed 64° vertical camera with 60 fps.
For the AR Drone 2.0 the front camera was replaced with a 720p HD camera
providing 30 fps.
DoBots Bot aka Dotty
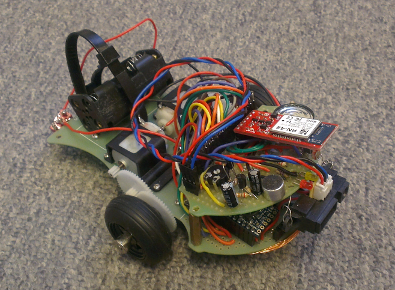
Last but not least Dotty, our home-made robot was included in this update. Dotty is our prototype for an autonomously recharging swarm robot. It’s bluetooth module enables us to directly connect it with an Android phone. It has a two motors which can be controlled separately and several sensors which can be streamed and displayed on the phone.
Control
At the current state, the robot can be driven around remotely from the phone and the streaming interval of the sensors can be adjusted.
Sensors
In the current version, Dotty includes the following sensors which can be displayed on the phone:
- Infrared
- Battery
- Light
- Microphone
Swarm Behaviour
To start with a simple showcase of controlling a set of different robots we
added the dancing swarm action to the app. Here any of the available robots
can be added to a list of dancing partners. In a next step, a Dance can be
created out of a set of predefined Moves. For now we started with the basic
moves consisting of: 1) forward / backward 2) left / right 3) rotate left /
right. Once the dance is started, every added robot will go through each of
the moves until the dance is over.
In addition, behind the scenes, a start-up and a shutdown phase were added
before and after the dance so that each robot can be prepared for remote
control. For example the AR Drone has to take off before the dance can start
and land again once it is finished.
To account for the differences between the robots without it reflecting back
to the control algorithm, a robot will only execute a move if it is available.
Otherwise it will skip the step and wait for the next (for example only the AR
Drone can move left and right, the other robots can only rotate left and
right).
Robot List
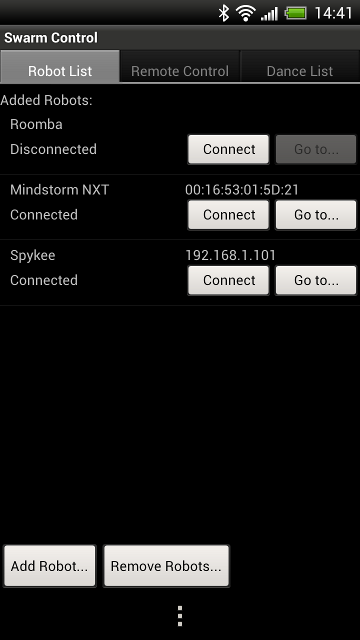
On starting up the dancing swarm action the list of robots has to be set up. After adding a robot to the list, it has to be connected. If the connection was successful, the status will change from Disconnected to Connected and the address of the selected robot will be shown next to its name. Once the connection is established, the screen for the individual robot can be displayed and its settings can be adjusted.
Remote Control
Once all robots are connected, the group can be remote controlled the same way as a single robot, using either the arrow keys or the joystick.
Note: the joystick is not available for the AR Drone
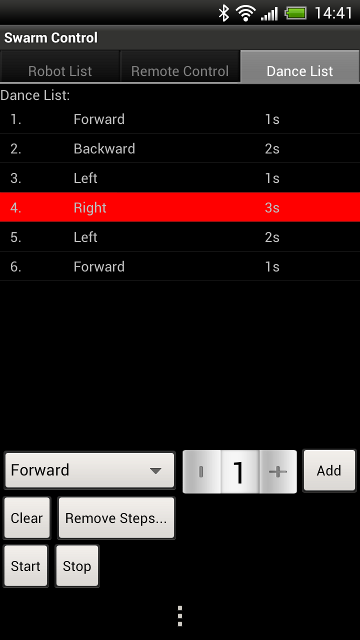
Dance List
To create a dance, one of the available moves can be selected from the drop
down menu. If desired, the move duration can be adjusted and the move added to
the list. The current dance list will be displayed in the list at the top.
Once the list is completed, a press on Start will let the robots execute the
dance. (The current step will be highlighted in red.)
Outlook
The app is still under heavy development and although a lot of our current stock of robots were added already there is lots of interesting stuff to come
- More Robots! A swarm can never be too big! There is still the Surveyor, the SpyGear Trakr, the Finch and the Terrain Twister But we are always looking for more, so if you know of any other robots with sensor which could be added to our collection let us know!
- We just started to tickle the iceberg of swarm control behaviours and our next ventures will be in the field of Multi Robot SLAM
- Interface robots with home automation systems, thus enabling them to interact with their surroundings and/or benefiting from sensors in their environment.
- And not forgetting, the robots want to be hooked up to the Internet and the cloud
If you are interested you should definitely keep an eye on the blogs of this website, where we will keep track of the development. But also the app is completely open source; you can find the code at https://github.com/eggerdo/swarm-control and the ready app on Google Play. Feel free to contribute and add your own robots to the list or let us know which ones you want to see added!
blog comments powered by Disqus
